Have you ever wondered why all the pages of your website don’t show up on Google? Want to check how many of your pages are listed? It’s easy! Just go to Google and type: “site:https://yoursite.com”.
Only one or two pages show up, but when you have five pages. That means Google does not know that all other pages from your site exist. So, how could you inform Google about your web pages? For that, you need to learn about how to set up Google Search Console. That helps Google to find and show all your pages. 📈
Why Do You Need Google Search Console?
First, Google Search Console is free! Second, it’s a special tool made by Google called a “webmaster tool.” But wait, what’s a webmaster? It’s a tool that helps Google learn about your website and all its pages. When you use this tool, Google can show all your web pages in search results. You can check how many pages are showing by using the query we mentioned earlier.
That’s why we say Google Search Console (GSC) is super important for anyone who owns a website, builds websites, or works on SEO. It doesn’t just help you get all your pages listed on Google – it also gives you helpful data about how your website is doing in Google Search.
Here are the key reasons why using Google Search Console is so important:
- Search Performance Analysis: It shows how your website performs in search, including clicks, impressions, and ranking positions.
- Crawl and Indexing Insights: You can track which pages Google indexes and receive alerts for issues that may prevent proper indexing.
- Fixing Errors: GSC highlights issues like broken links, mobile usability problems, and Core Web Vitals performance, which are crucial for SEO.
How to Set Up Google Search Console
Here are the steps to help you learn how to set up Google Search Console.
Step 1: Sign in to Google Search Console
- Go to Google Search Console and click Start Now.

- Sign in using your Google Account. If possible, use the same account you use for Google Analytics and Google Tag Manager.
Step 2: Add Your Property
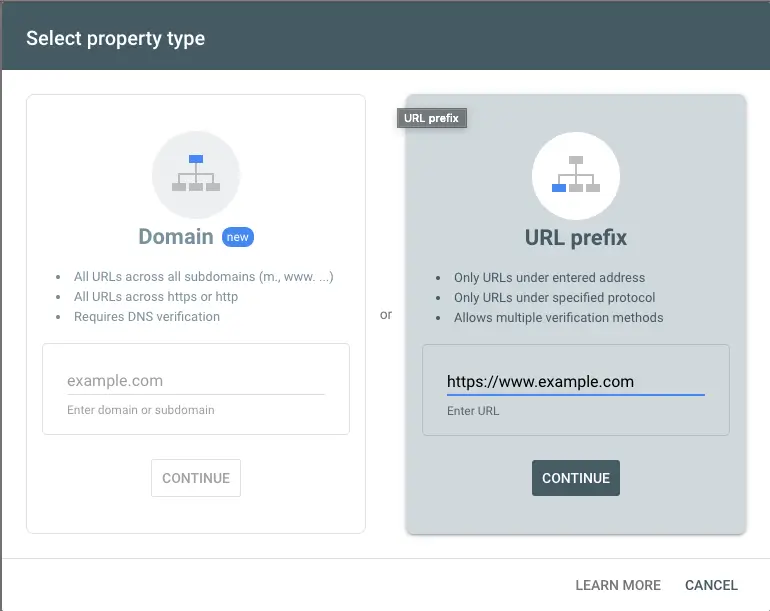
Choosing the right property type is important for accurate data collection. Google provides two ways to add your website:
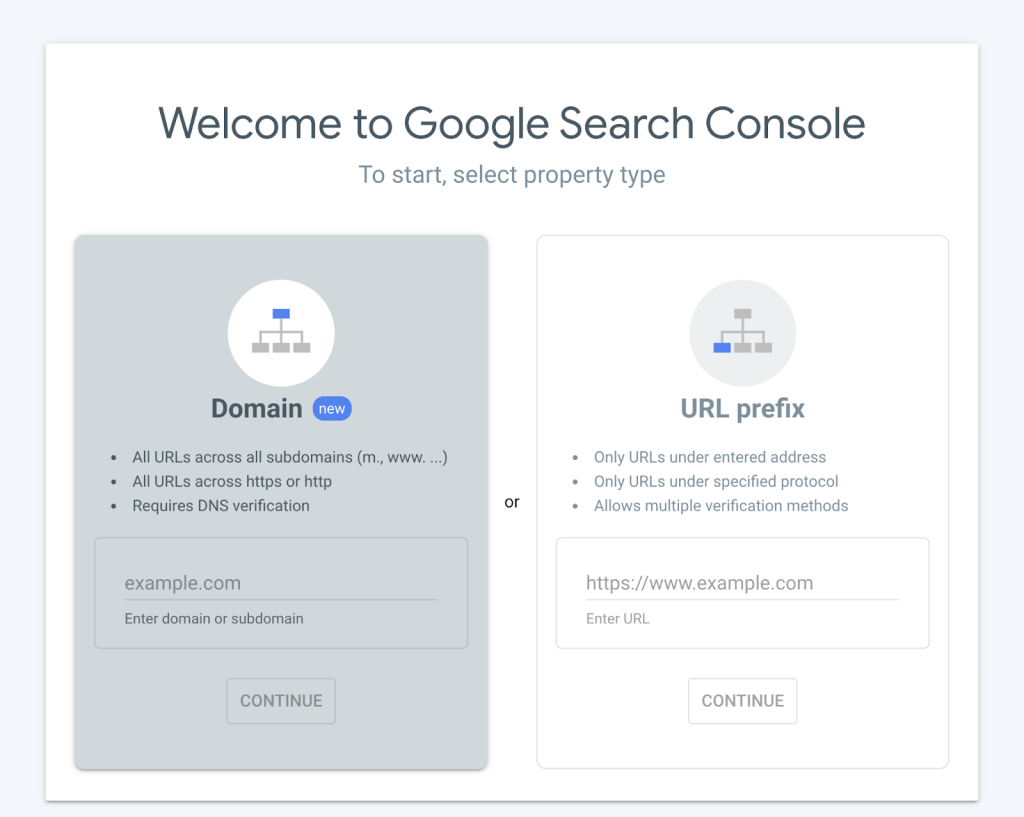
👉 Domain Property:
- Covers your entire domain, including subdomains.
- e.g., www.example.com and blog.example.com.
👉 URL Prefix Property:
- Tracks a specific URL prefix.
- e.g., if you enter the property https://www.example.com then you can not request the index for other subdomains like blog.example.com. You are only able to request the indexing for https://www.example.com/blog.
Step 3: Verify Your Property
Depending on the property type you selected, the verification methods may differ:
👉 DNS TXT Record Verification (for Domain Property):
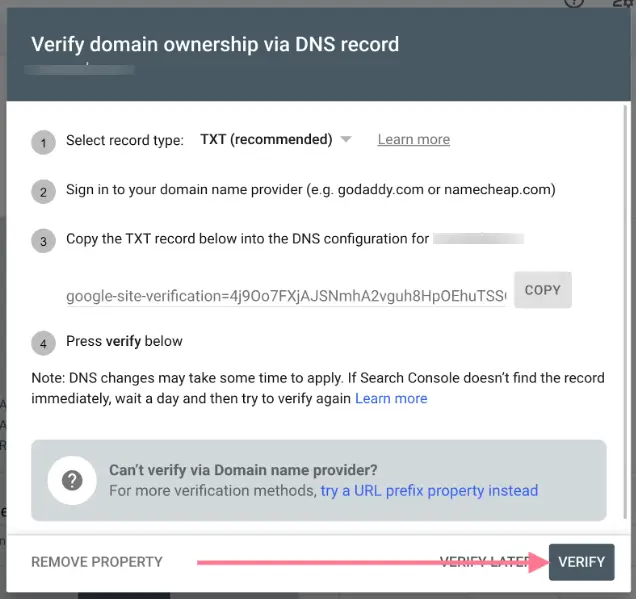
- Enter your domain name without https:// or http:// then click “Continue”
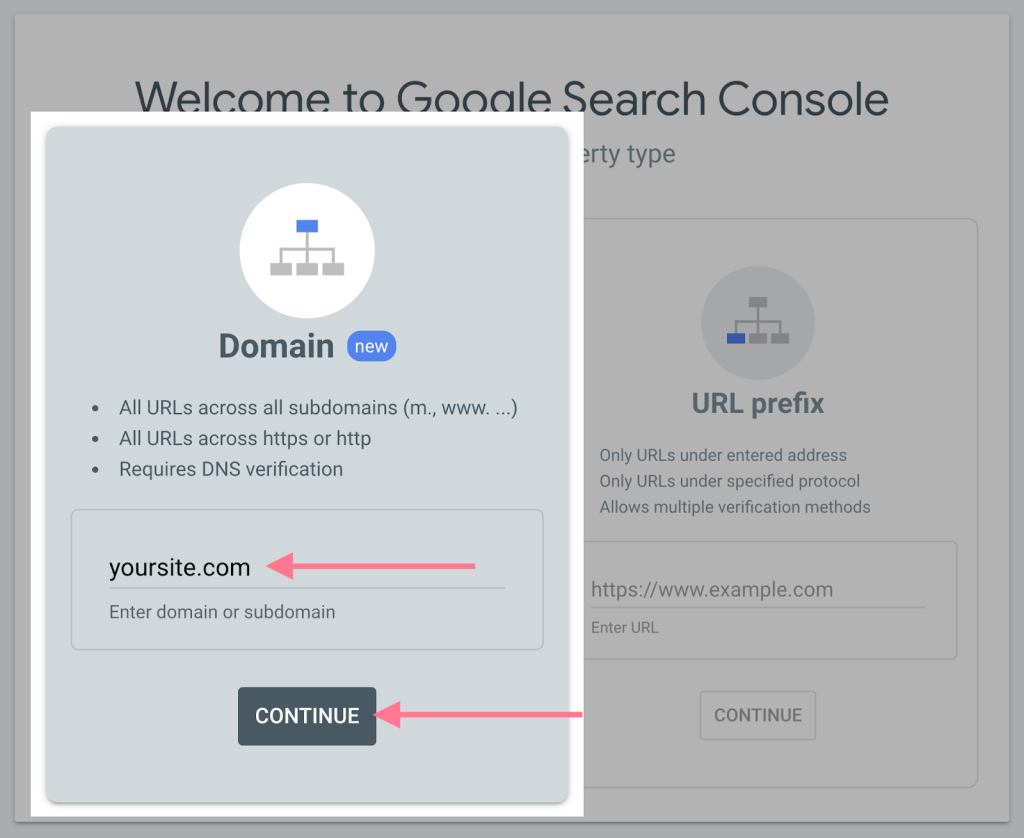
- Copy the TXT record provided by the Google Search Console.
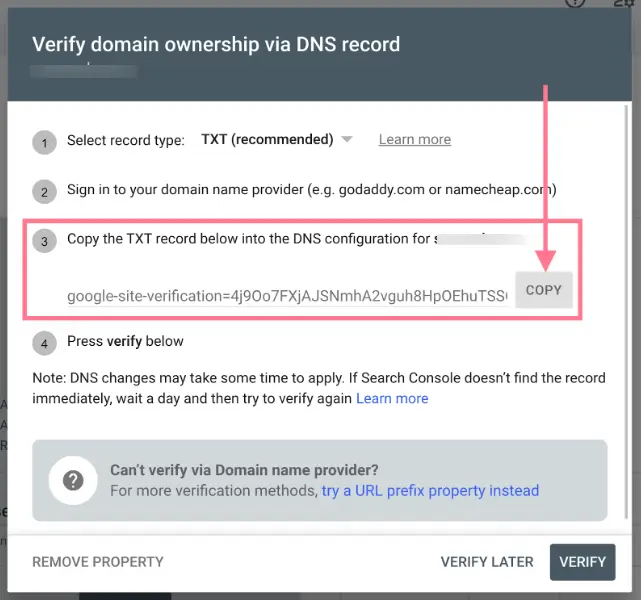
- Go to your domain registrar (e.g., GoDaddy, Bluehost, Cloudflare Namecheap, etc).
- Navigate to the DNS settings and add a new TXT record.
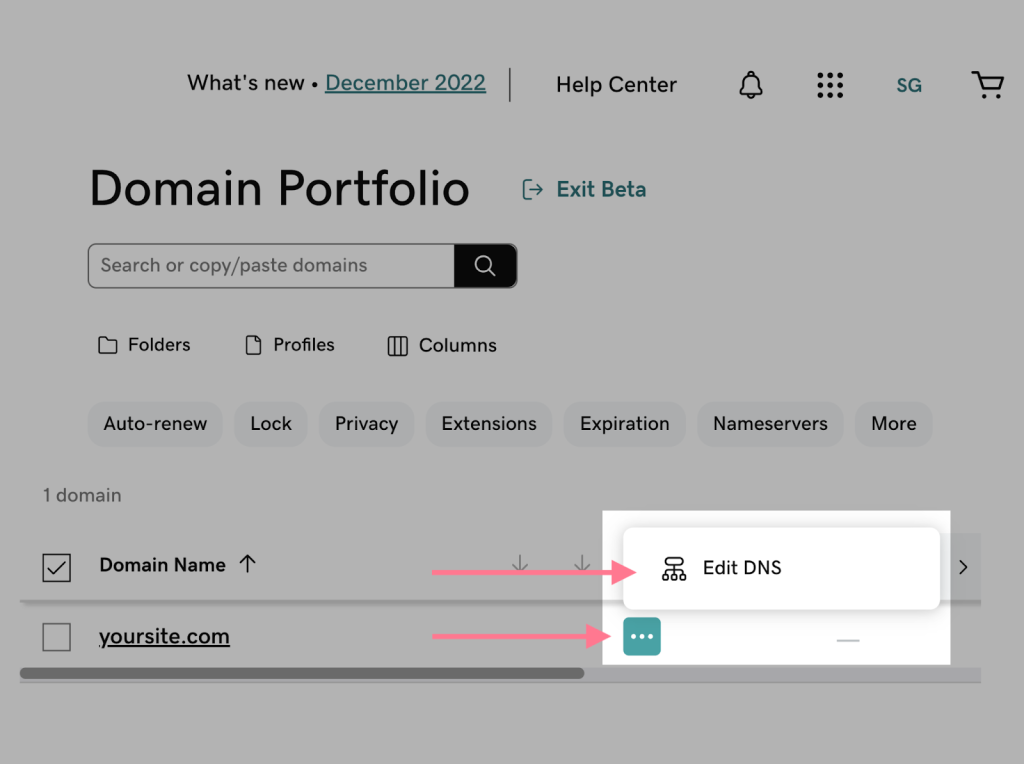
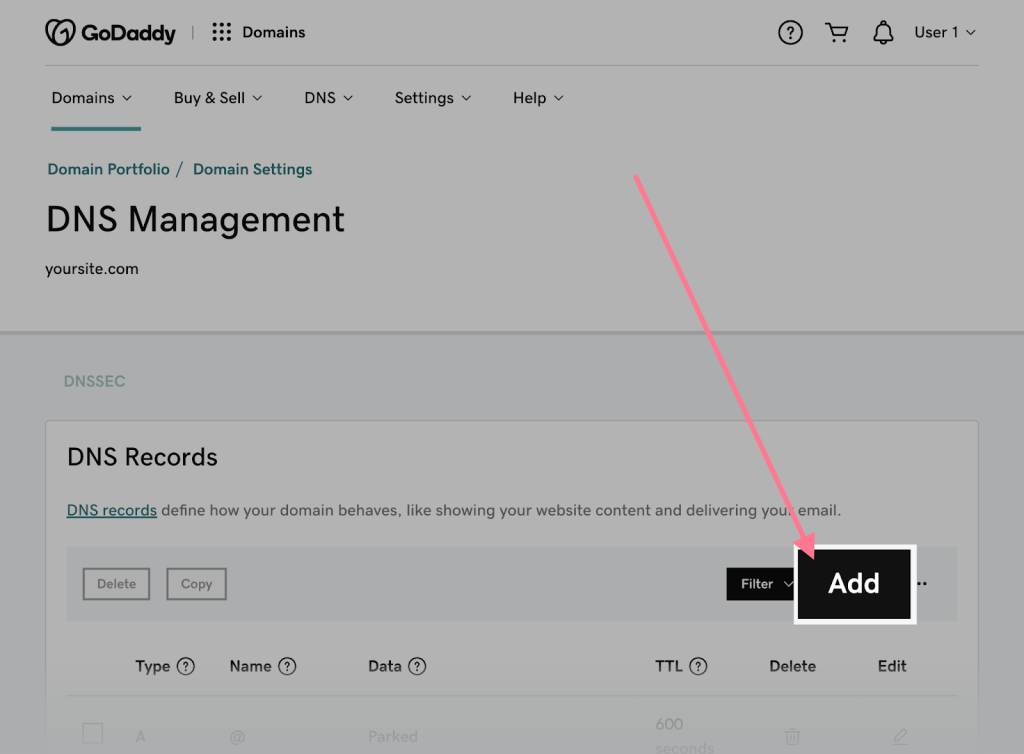
- Paste the TXT value provided by Google.
- Type: TXT
- Name: @
- Value: [Value that provided by the GSC]
- TTL: 1 Hour
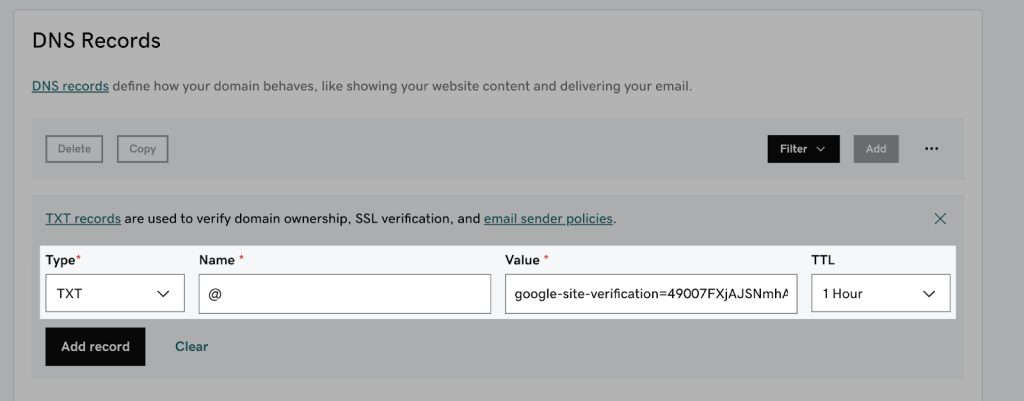
- Save changes and return to Google Search Console to click Verify.
👉 HTML Tag Verification (for URL Prefix Property):
1. Enter the URL with the prefix. Remember if you enter the domain with http://example.com then only pages of http://example.com can request an index.
2. Here you can get the multiple option through which you can Verify the property.
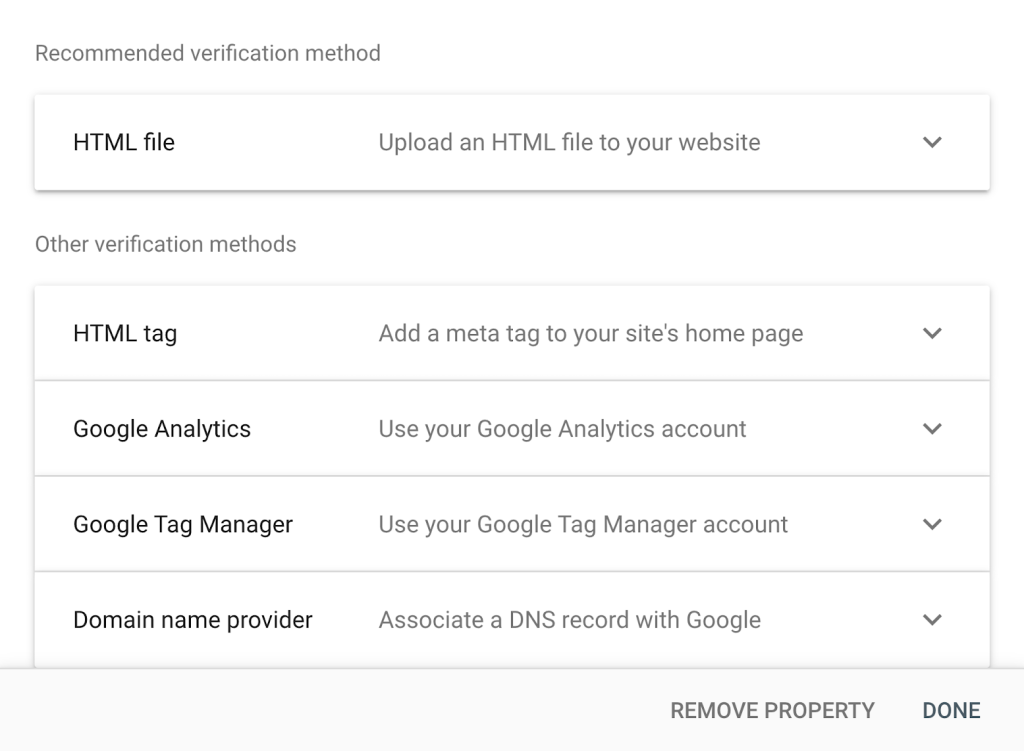
First let’s verify the property with the HTML tag. Click on HTML Tag
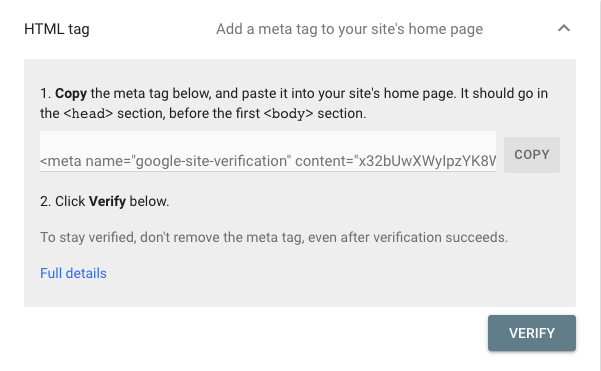
3. Copy the meta tag provided by Google Search Console.
4. Add it to the <head> section of your website using an SEO plugin or by manually editing the code.
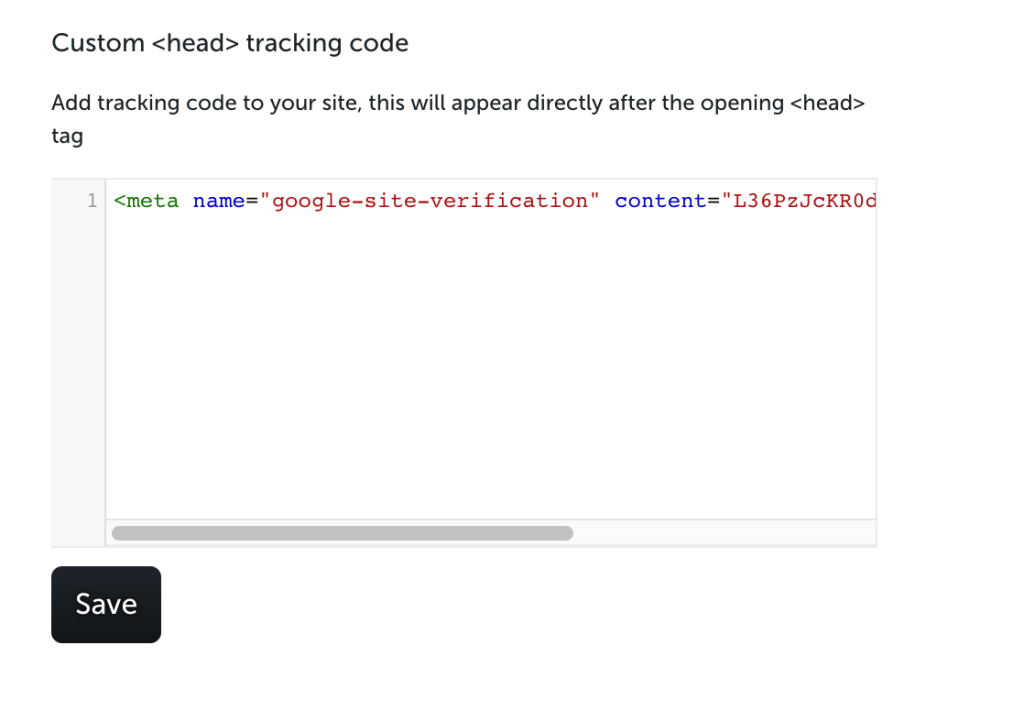
5. Return to Google Search Console and click Verify.
👉 HTML File Verification (for URL Prefix Property)
1. Now let’s discover another technique through which you can verify your URL prefix property.
- Download the HTML file that is provided by the Google Search Console.
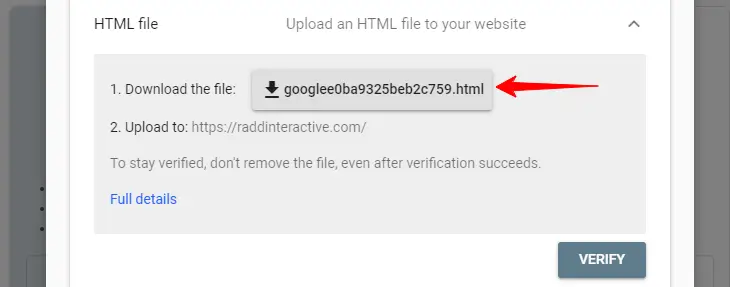
2. Now access the root directory of your website (aka public_html)
3. Uploaded the downloaded in the root directory.
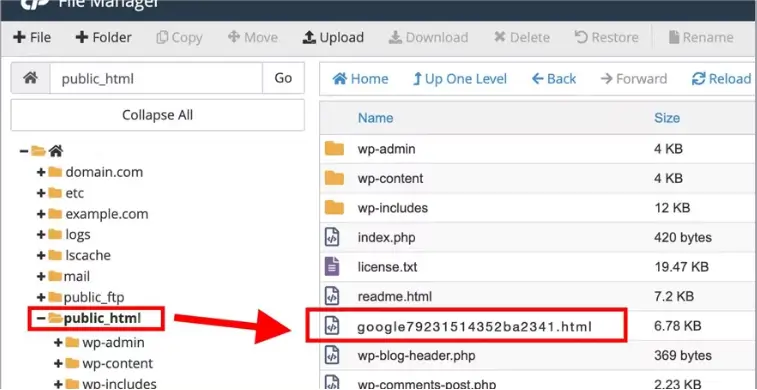
4. Now, return to Google Search Console and click Verify.
👉 What if You Use SEO Plugins Like Yoast or All in One SEO?
If you are using plugins like Yoast or All in One SEO, you can still set up Google Search Console manually. These plugins make it easier to verify your property. That allows you to add the verification meta tag directly into your website’s header without editing the code manually.
Steps for Yoast:
1. In Google Search Console, copy the HTML tag verification method and copy the meta tag.

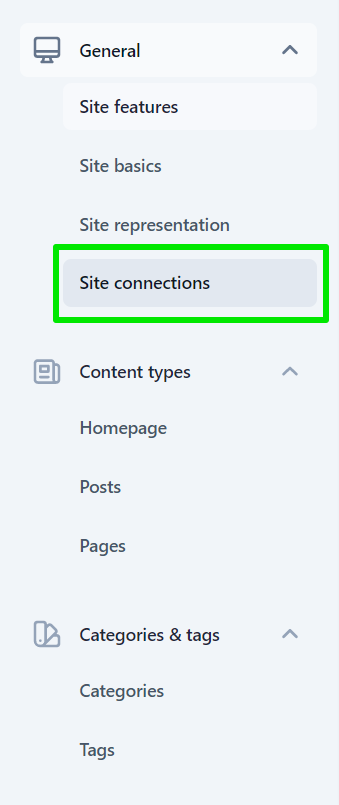
2. Go to your WordPress dashboard → Yoast SEO → General → Site Connection
3. Paste the meta tag in the Google Verification Code field.
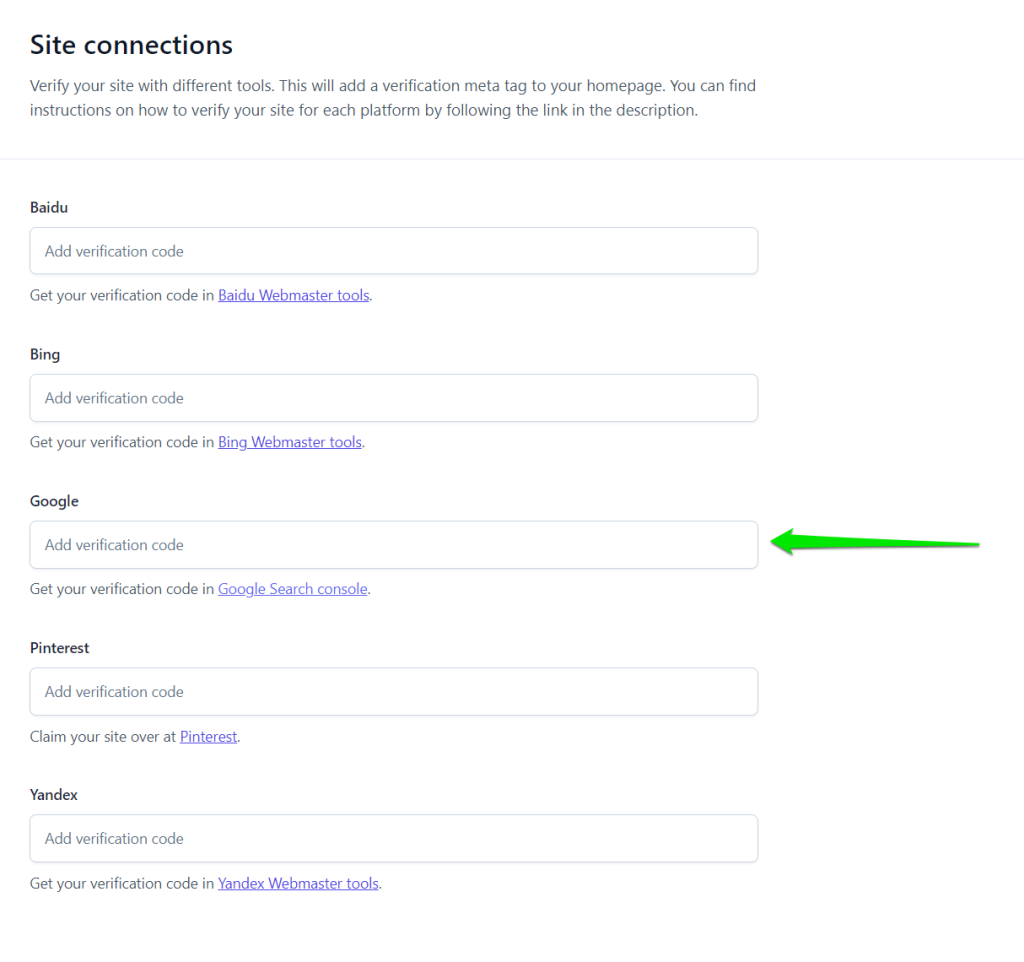
4. Save changes and click Verify in Google Search Console.
Step 4: Submit Your Sitemap
Submitting a sitemap helps Google understand your website’s structure. That helps Google bot to know about all your important pages. It also gives instructions on how to crawl and index all pages. As a result, not all of your critical pages are missed.
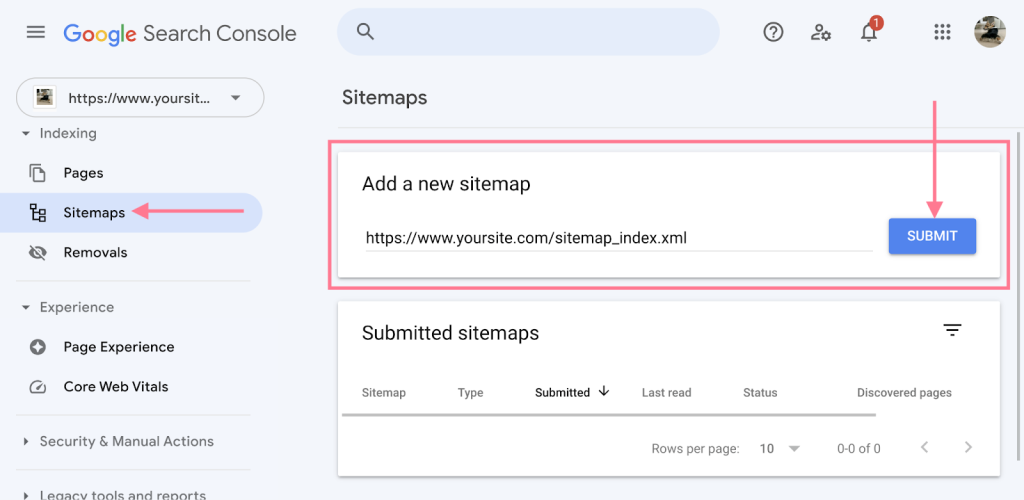
1. In the left menu, click Sitemaps.
2. Enter the URL of your sitemap, it’s sitemap_index.xml.
3. Click Submit.
👉 What if You Use Yoast or All in One SEO?
Both Yoast and All in One SEO automatically generate a sitemap for your website. You can find your sitemap by visiting https://yourdomain.com/sitemap_index.xml (Yoast) or https://yourdomain.com/sitemap.xml (All in One SEO). Copy this URL and submit it to Google Search Console.
Step 5: Check Index Coverage and Fix Issues
1. After submitting your sitemap, go to the Indexing -> Pages section in Google Search Console. Here you can find how many of your pages are Indexed and how many of your pages are Not Indexed.
2. Review the Not Indexed Pages:
- Errors: Pages that Google couldn’t index due to critical issues.
- Valid with Warnings: Pages that were indexed but may have issues.
- Valid: Successfully indexed pages.
- Excluded: Pages that were intentionally excluded (e.g., via robots.txt or noindex tags).
Yoast and All in One SEO allow you to control which pages should be indexed by Google and which should not. For example, you can set pages like “thank you” pages or admin pages as noindex. That prevents them from appearing in search results.
Step 6: Monitor Performance and Optimize
Monitoring your site performance helps you identify high-performing pages and keywords. That allows you to optimize your content further.
Go to the Performance section to track key metrics like:
- Clicks: How many users clicked on your website in Google search results?
- Impressions: How often your site appeared in search results.
- Average Position: Your average ranking position for various queries.
- CTR (Click-Through Rate): The percentage of impressions that resulted in clicks.
Pro Tip
Connect Google Search Console with Google Analytics for more detailed insights into user behavior and engagement on your site.
If you’re wondering how to set up Google Analytics, check out our blog: “How to Set Up Google Analytics 4 (GA4) on Your Website.”
Boost Your Website Visibility with Expert Support
“How to set up Google Search Console” is a commonly asked question. At Hashcrypt Technologies, we assist all kinds of businesses in setting up their Google Search Console and Google Analytics. Our SEO team also helps monitor performance and resolve errors that occur during website indexing.
So, what are you waiting for? Contact our team and make your website discoverable by search engines!
If you found this blog helpful, feel free to share it with your friends and colleagues 🙂


