


Introduction:
In today’s digital age, understanding your website’s performance is crucial for success. One powerful tool for gaining insights into your online presence is Google Analytics. In this article, we will delve into the process of how to set up Google Analytics 4 (GA4) on your website, ensuring you can effectively track and analyze your site’s performance.
What is Google Analytics 4(GA4)?
Google Analytics 4 (GA4) represents the next evolution in web analytics, offering businesses a deeper understanding of user behavior across various digital platforms. Where Universal Analytics (UA) primarily focuses on website interactions, GA4 incorporates app and web data into a single property. This unified data model enables businesses to gain comprehensive insights into user engagement, regardless of the device or platform they’re using.
One of the key features of GA4 is its emphasis on event-based tracking. Rather than relying solely on pageviews and sessions, GA4 allows businesses to track specific user interactions. Such as button clicks, video views, and purchases. This level of tracking provides a better understanding of user behavior and allows businesses to optimize their marketing strategies accordingly.
GA4 introduces advanced machine learning capabilities. Here with advanced capabilities, businesses can get predictive analytics. GA4 helps businesses anticipate user actions and tailor their marketing efforts to drive better results. Google Analytics 4 represents a significant step forward in the world of web analytics. And help businesses to make data-driven decisions that fuel growth and success.
How to set up Google Analytics 4?
Here, follow the steps and get the answer to your question “How to set up Google Analytics 4”.
Step 1: Go to https://analytics.google.com
Sign in with your Google account. If it’s your first time, you’ll need to create a new account.
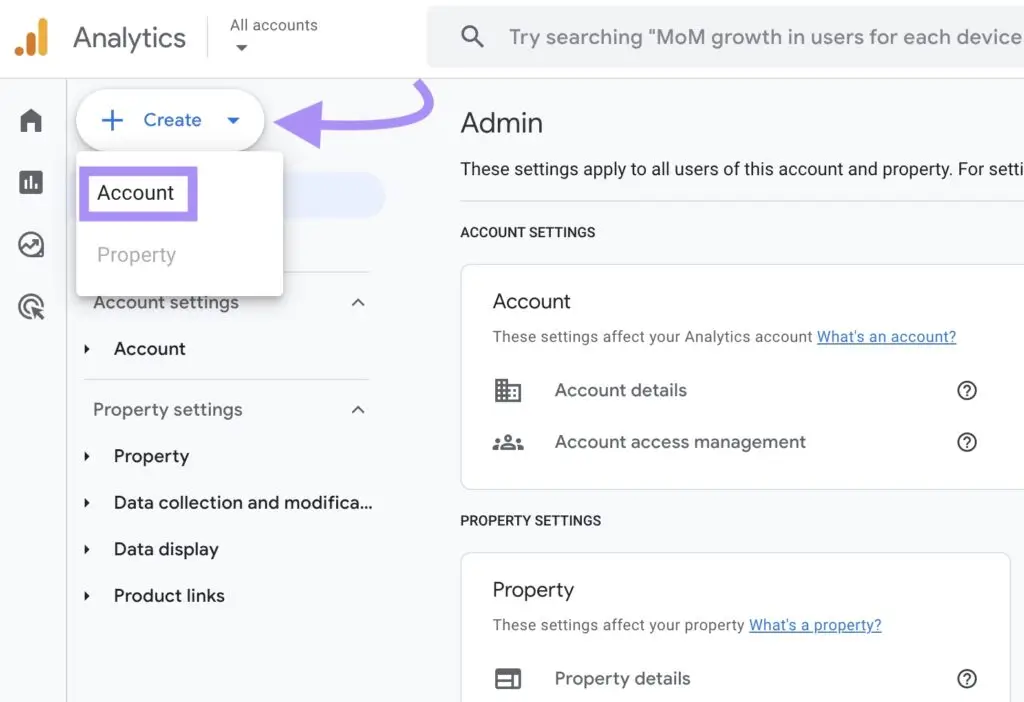
Step 2: Now Create a GA4 Property. To create a GA4 property navigate to the Admin section (gear icon)

Step 3: click “Create” and create a New Account, And give an accurate name that streamlines your business. Then click on “Next”
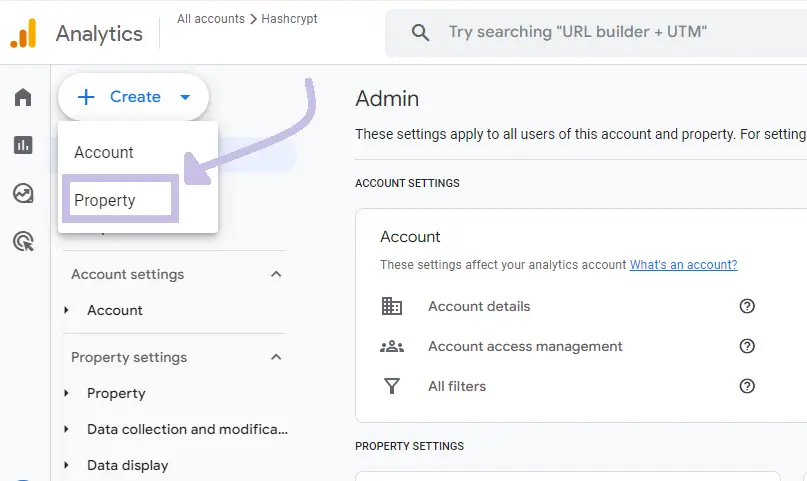
Step 4: Create a New GA4 Property (For New Accounts):
- In your Google Analytics account, navigate to the “Admin” section (gear icon).
- Click “Create” and select “Property.”
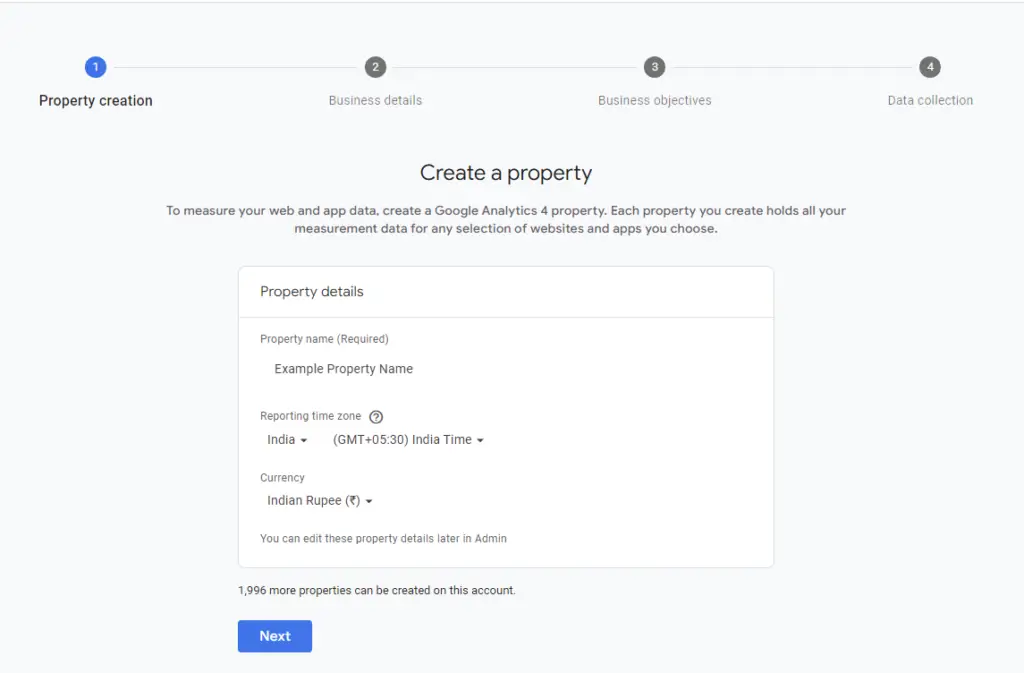
Step 5: Step Define Your Property Details:
- Give your property a clear name: Use something easy to recognize, like your website domain or business name.
- Set the reporting time zone: Choose the zone that aligns with your audience or business operations.
- Pick a currency: This will be used for reporting website-related financial data. Then click on “NEXT”
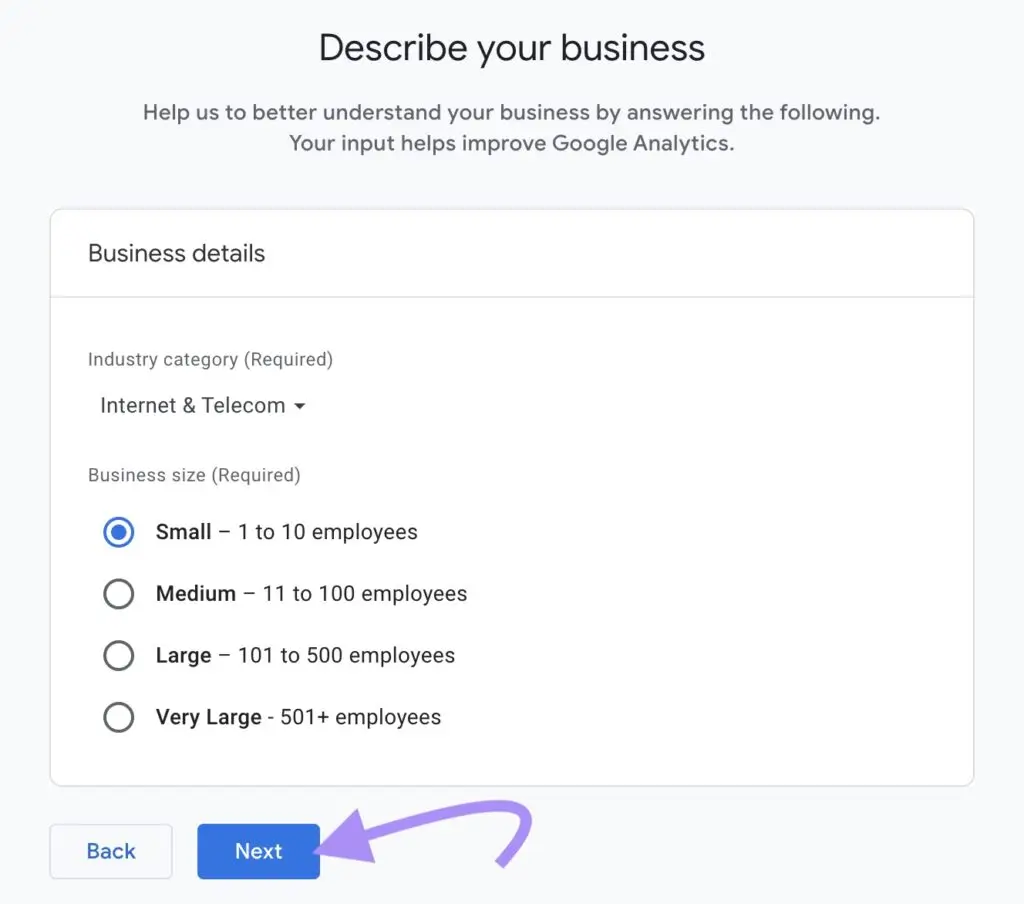
Step 6: Select the industry category that best reflects your business type and your business size (e.g., small, medium, large). Then Click on “NEXT”
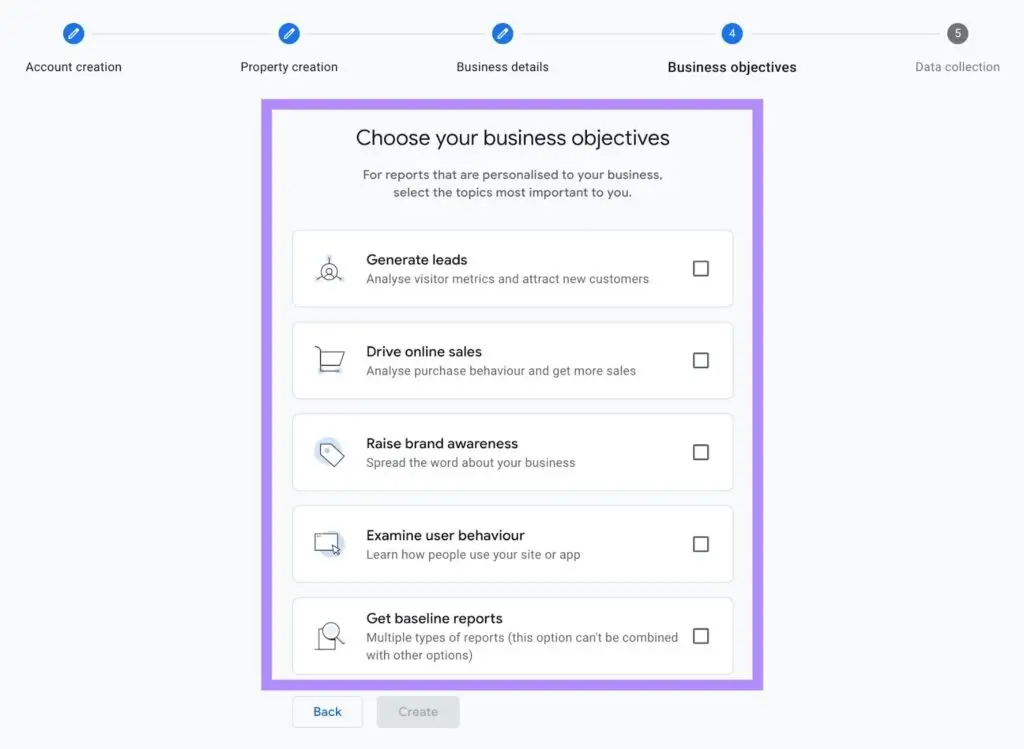
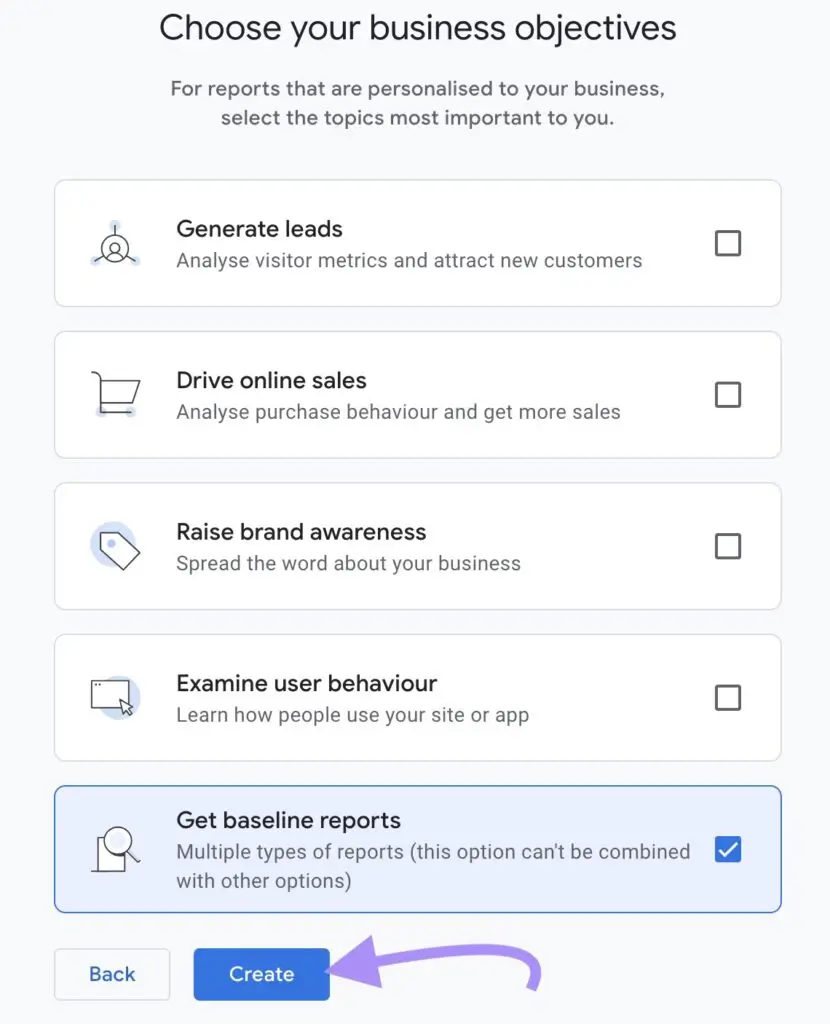
Step 7: Choose Your Business Objectives. This helps GA4 tailor reports to your specific goals. Options include “E-commerce,” “Lead Generation,” or “Engagement.” You can always adjust these later.
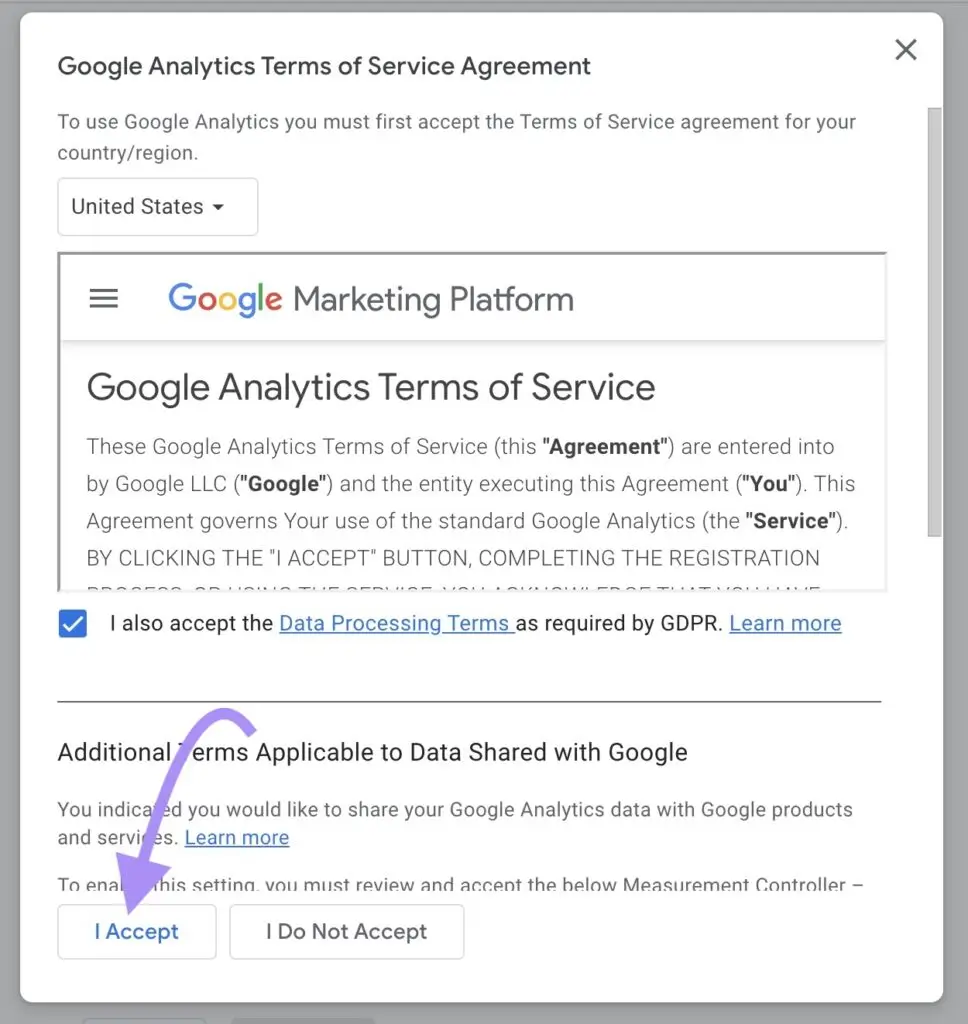
Step 8: Click “Create” to establish your GA4 property. If setting up a new account, accept the Terms of Service and Data Processing Amendment.
Step 9: Since you’re tracking a website, click the “Add Stream” button and choose “Web” as the stream type.
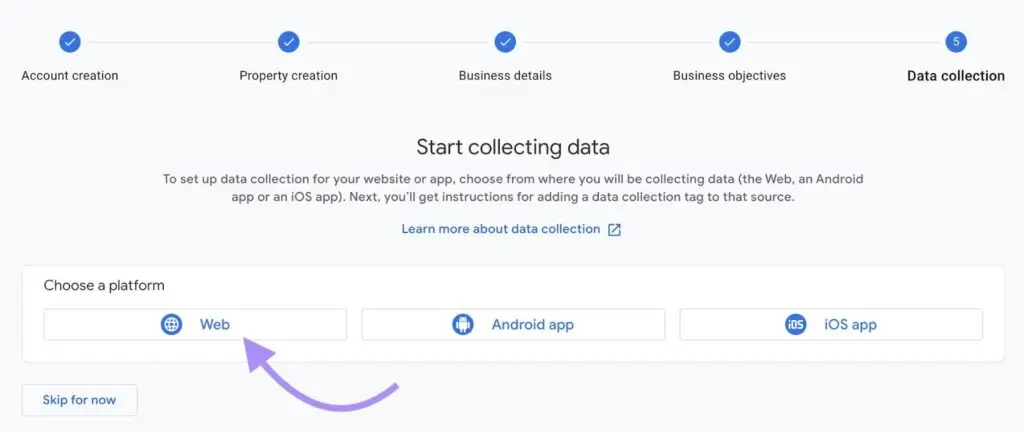
Paste your website’s complete URL (including https://) into the designated field.
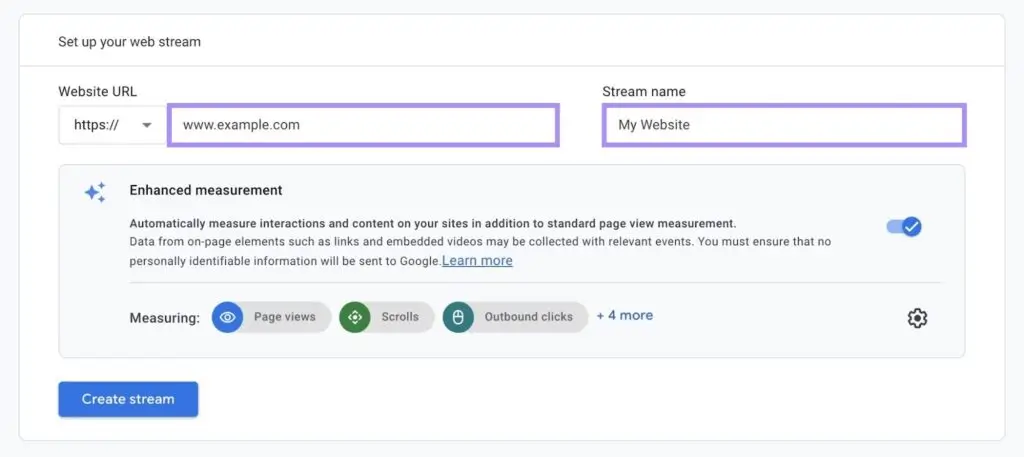
Choose a name that identifies the stream’s purpose. For example, you could use your website domain name or “Main Website Traffic.” Then click “Create Stream”
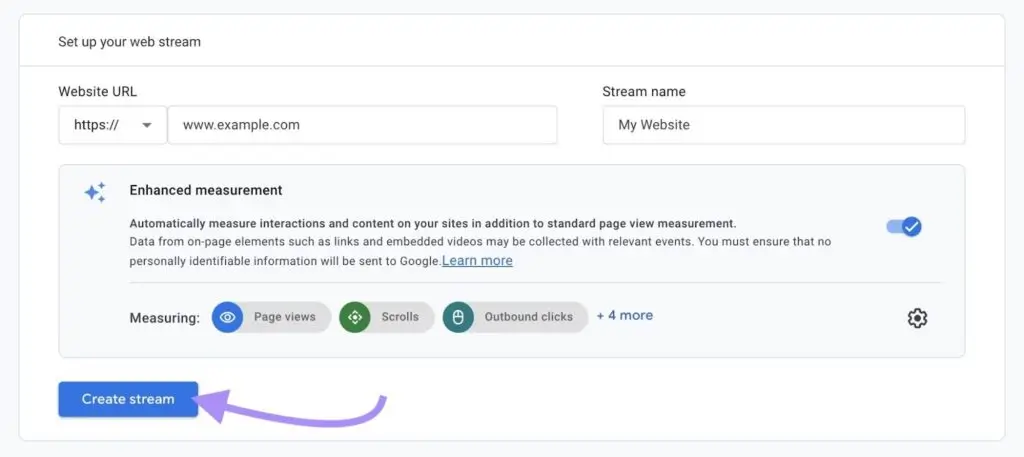
After creating a stream, you get the Measurement ID. Now install the GA4 on your website.
How to Install GA4 on Your Website?
GA4 installed on your website is essential to understanding your audience and optimizing your online presence. In this article, we will discuss how to install GA4 on your website using two different methods:
1. Install GA4 Manually
2. Install GA4 with Google Tag Manager
1. Install GA4 Manually
Step 1: Head to your Google Analytics account and navigate to the “Admin” section (gear icon).
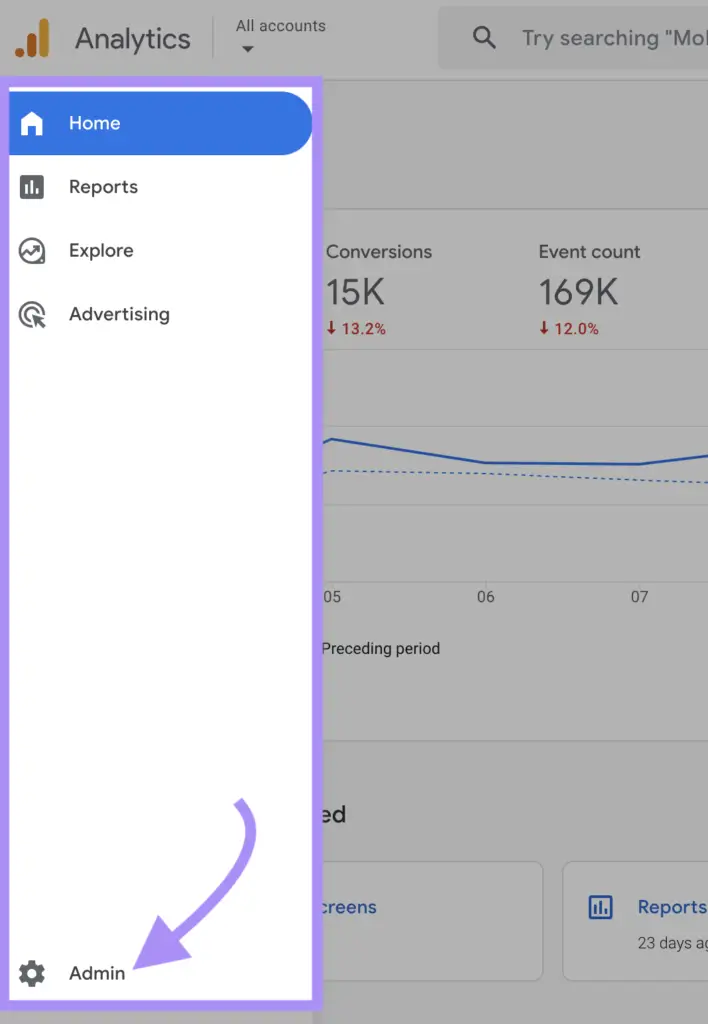
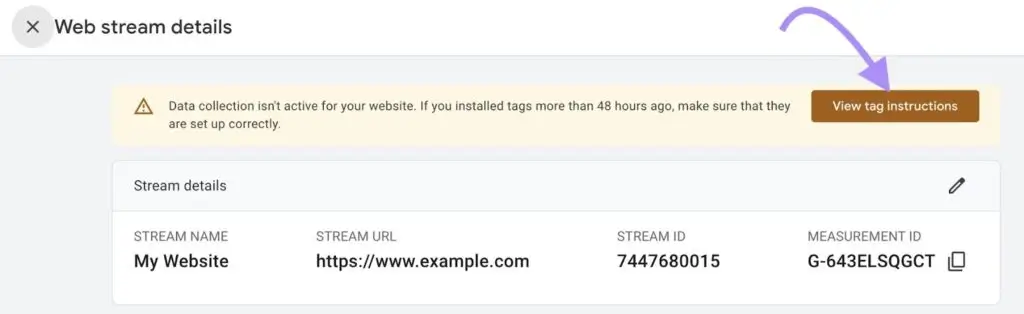
Step 2: Within the property settings, locate the “Data Streams” section. Click on the data stream you want to use.

Under the stream settings, look for the “View Tag Instruction” and click on the button with the same name. This is where you’ll find the GA4 tracking code snippet.
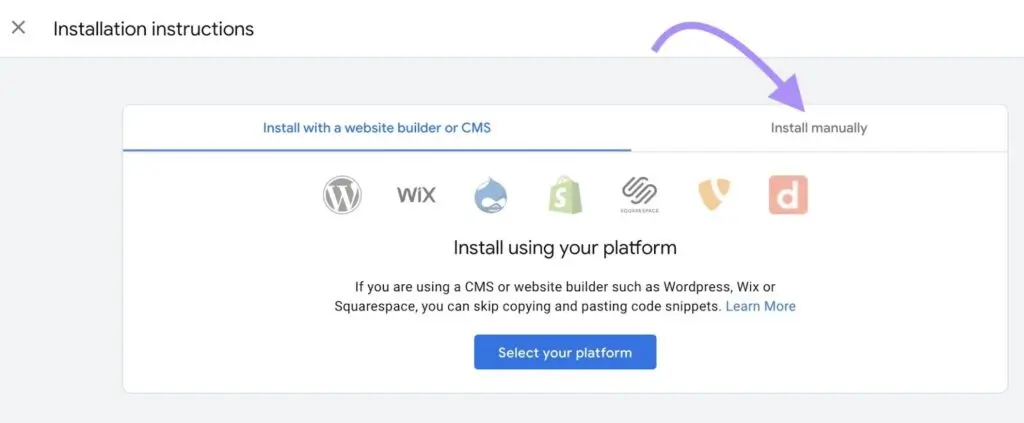
Step 3: Under “Installation instructions,” choose “Install manually.” This will display the GA4 tracking code snippet.
Step 4: Copy the entire code snippet displayed on the screen.

Step 5: Paste the copied GA4 tracking code snippet immediately after the opening <head> tag. Make sure the code is properly indented within the <head> section.
Save the changes you made to your website’s HTML file. Upload the updated file back to your website’s hosting platform.
It might take some time for GA4 to start collecting data after implementing the code.
2. Install GA4 with Google Tag Manager
Step 1: Log in to your Google Tag Manager account and select the container associated with your website.
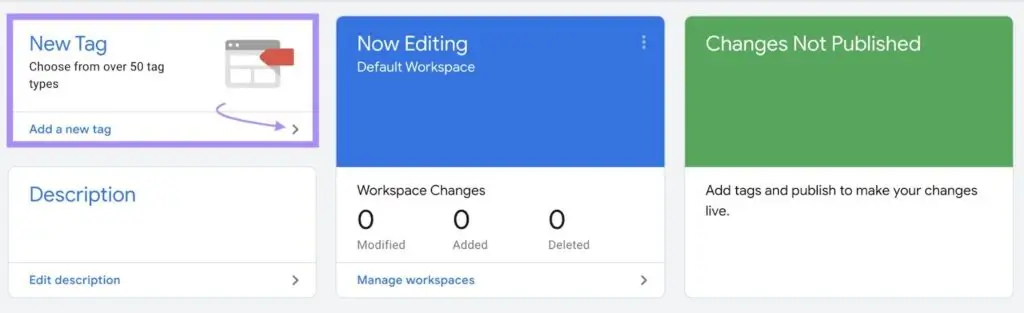
Step 2: Click on “Tags” in the left-hand menu, then click “New Tag” to create a new tag.
Give the proper name to your google tag.
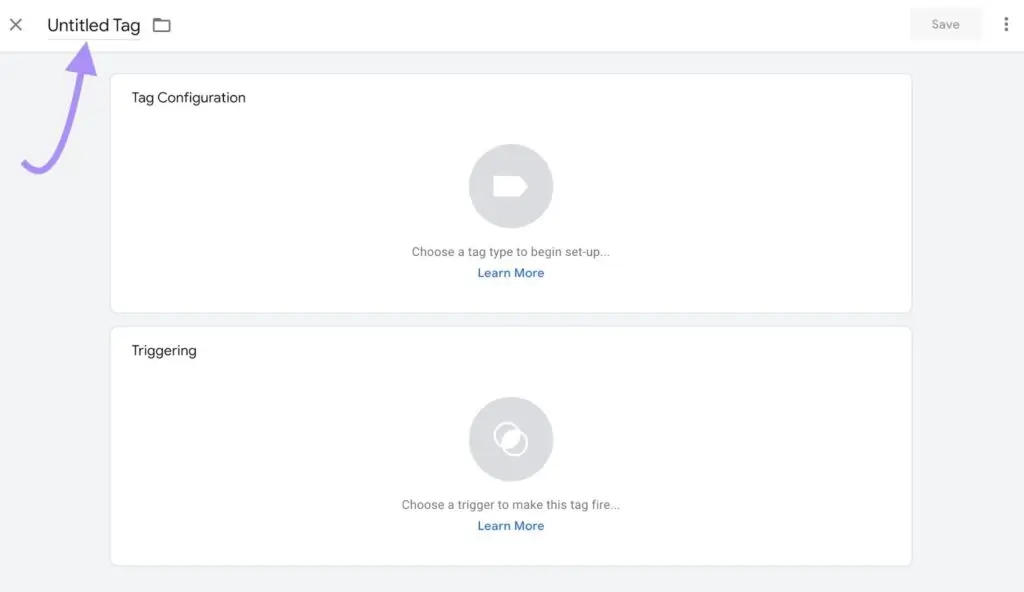
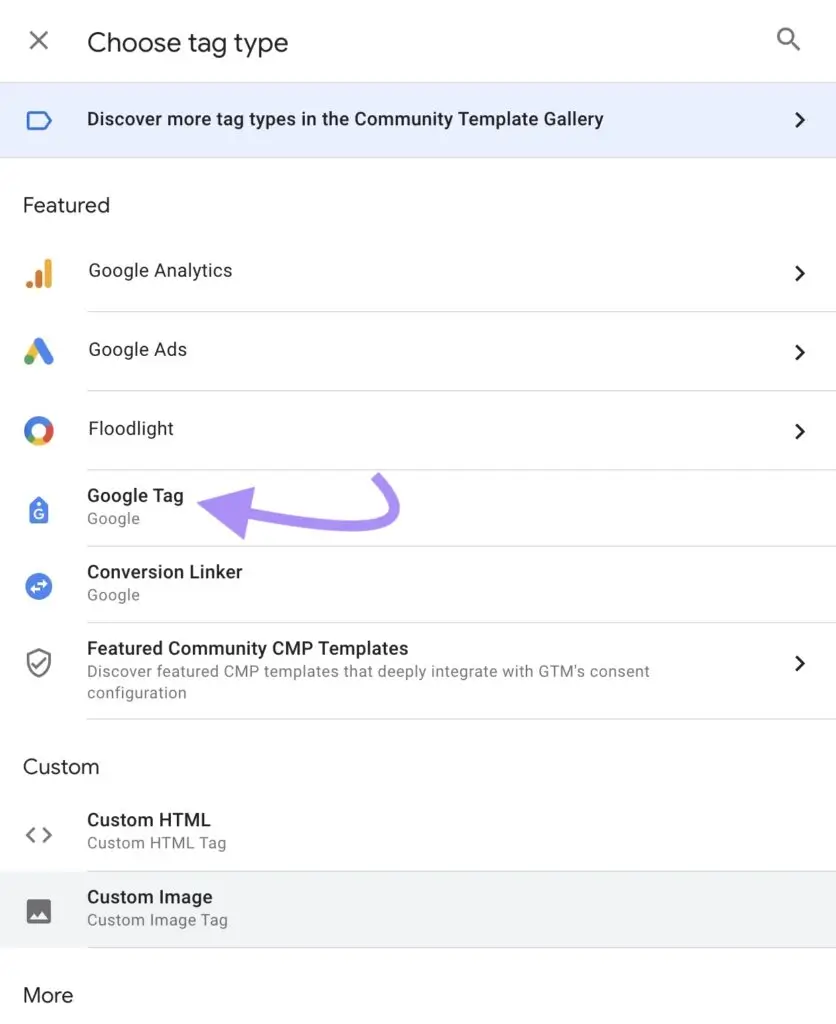
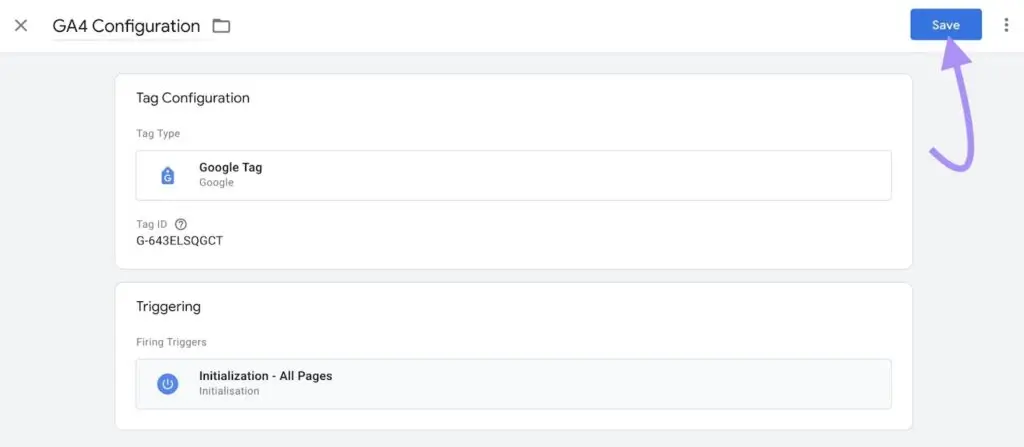
Step 3: Click anywhere on the “Tag Configuration” box.
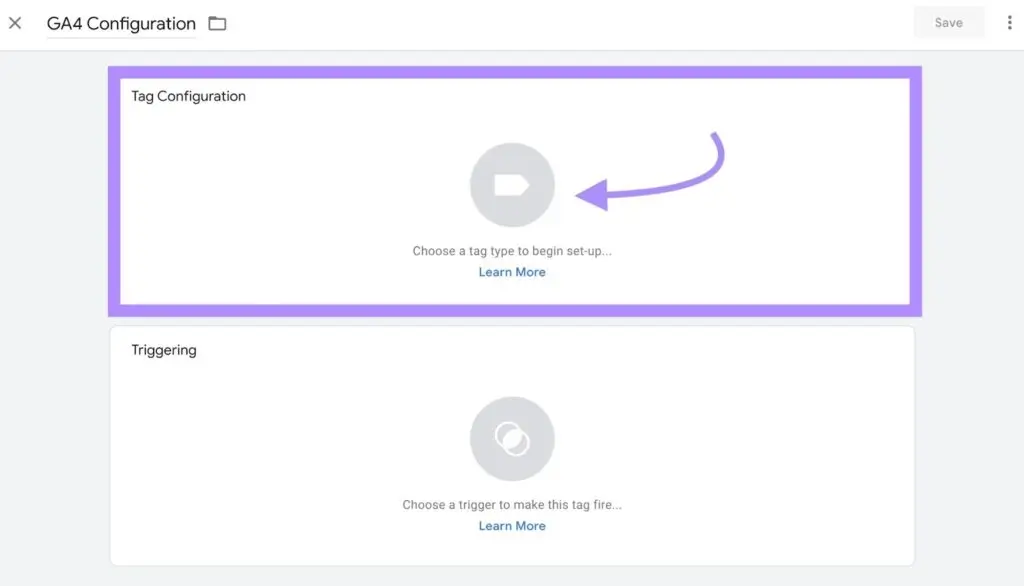
Choose “Google Tag” as the tag type.
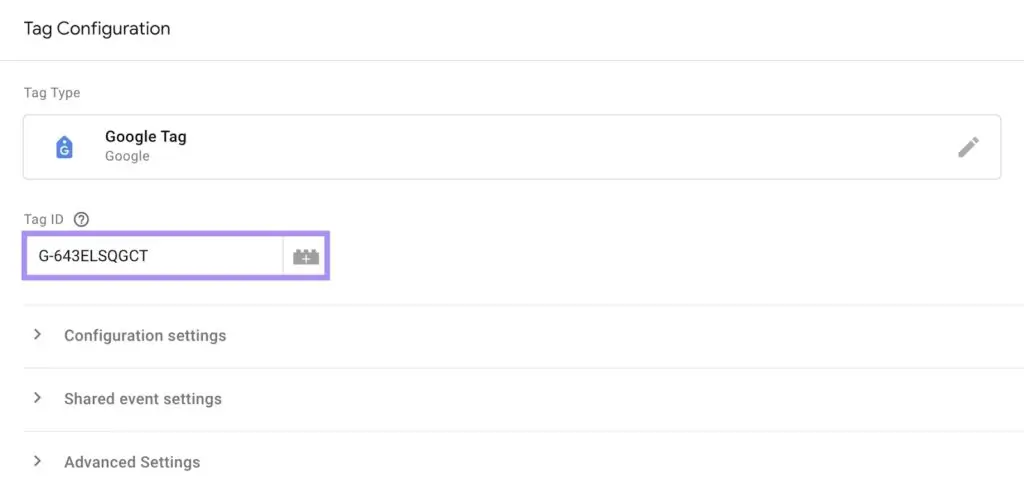
Step 4: In the “Tag ID” field, enter your GA4 Measurement ID obtained from your GA4 property settings.
Step 5: Click anywhere on tagging box
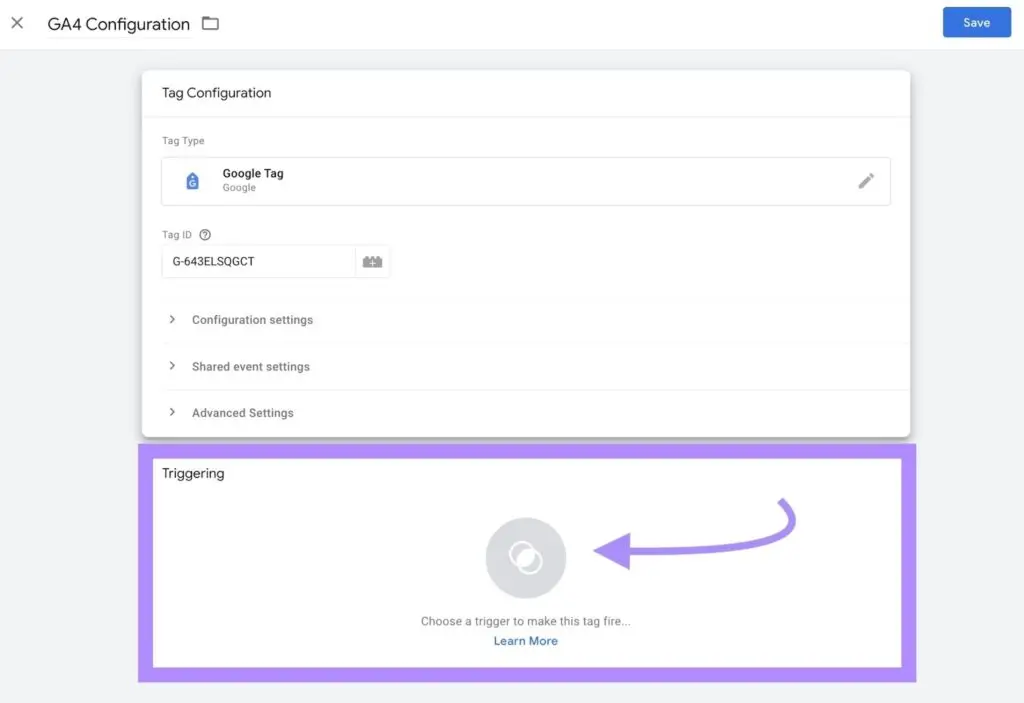
Now you need to define when the tag should fire and send data to GA4. You can choose various triggers, such as “All Pages”, or “Initialization – All Pages” to track every website visit or more specific triggers based on user actions (e.g., button clicks, form submissions).
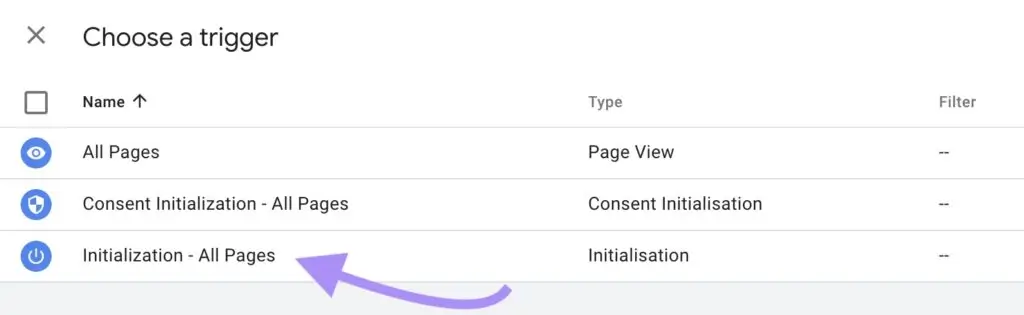
“Initialization – All Pages” is a standard GA4 trigger option. This trigger ensures the GA4 tag fires first, capturing user data before other tracking codes on your website.
Step 6: Once you’ve configured the tag and trigger, give your tag a descriptive name and click “Save.”
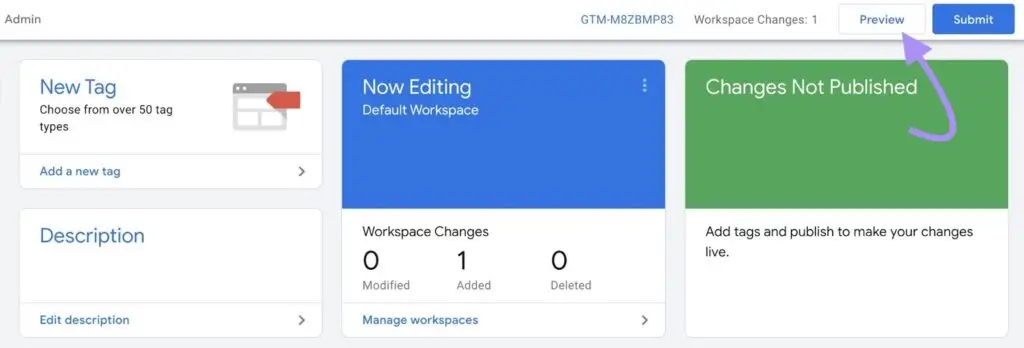
Step 7: Use GTM’s “Preview” mode to test your tag implementation before publishing it live.
Step 8: Google Tag Assistant opens in a new browser tab. Enter your website’s domain name in the “Your website’s URL” field and click “Connect.”

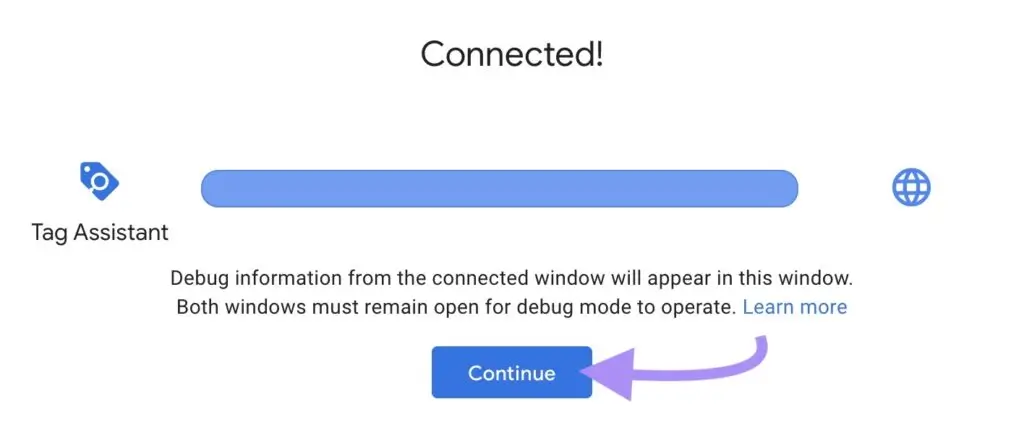
Step 9: A new window will load your website. Leave this window open and switch back to the Tag Assistant page. If successful, you’ll see a “Connected!” message. Click “Continue” to close it.
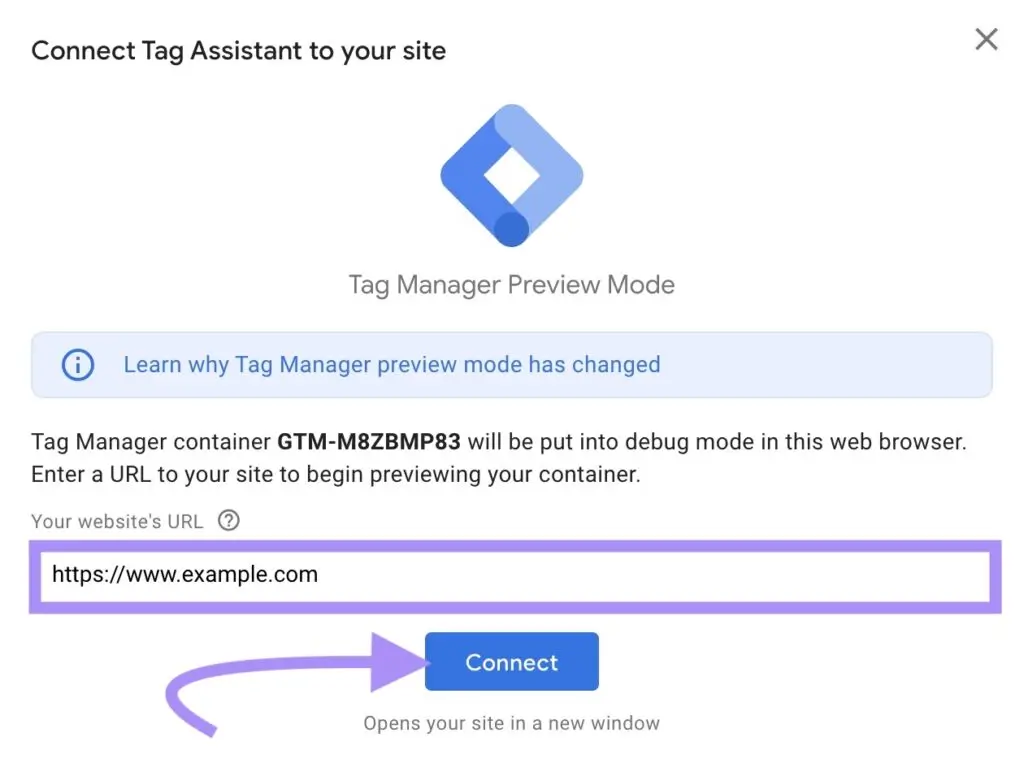
Step 9: A new window will load your website. Leave this window open and switch back to the Tag Assistant page. If successful, you’ll see a “Connected!” message. Click “Continue” to close it.
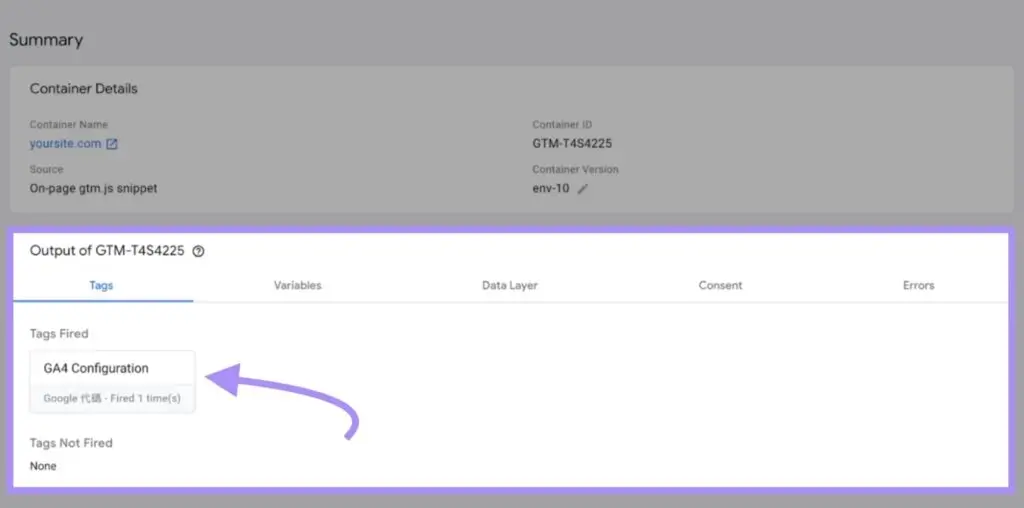
Step 10: Under “Tags Fired,” you should see your GA4 tag listed. This indicates that GTM loaded the tag successfully.
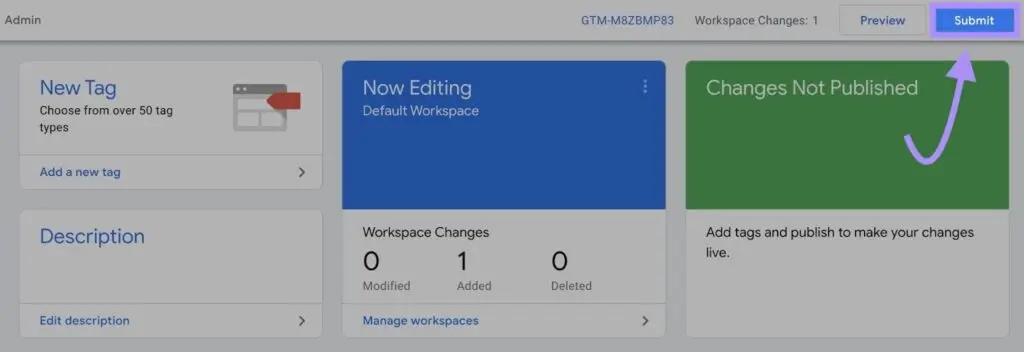
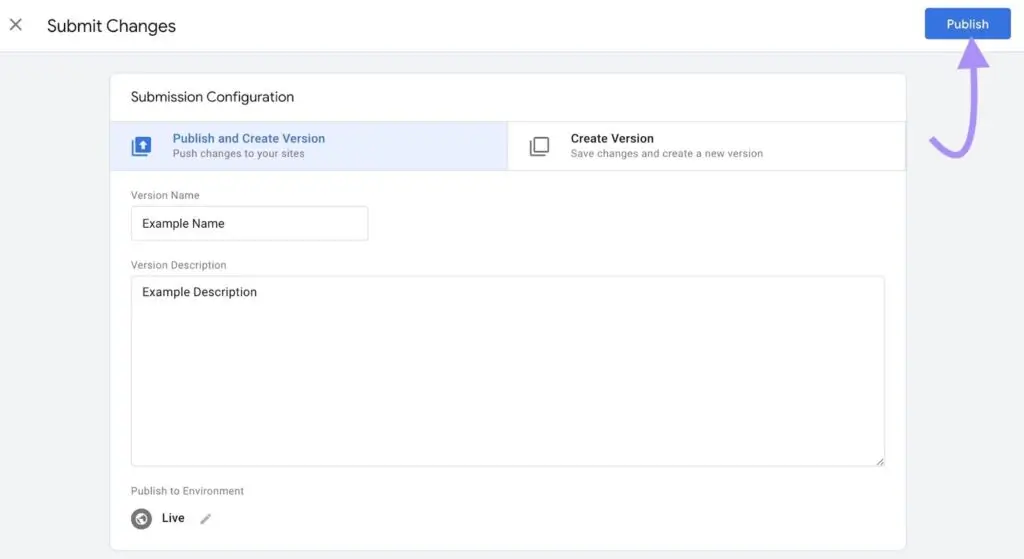
Step 11: Close Tag Assistant and your website window. In your GTM container workspace overview, click “Submit” to save changes.
Step 12: A “Submit Changes” window will appear. Leave “Submission Configuration” as “Publish and Create Version.”
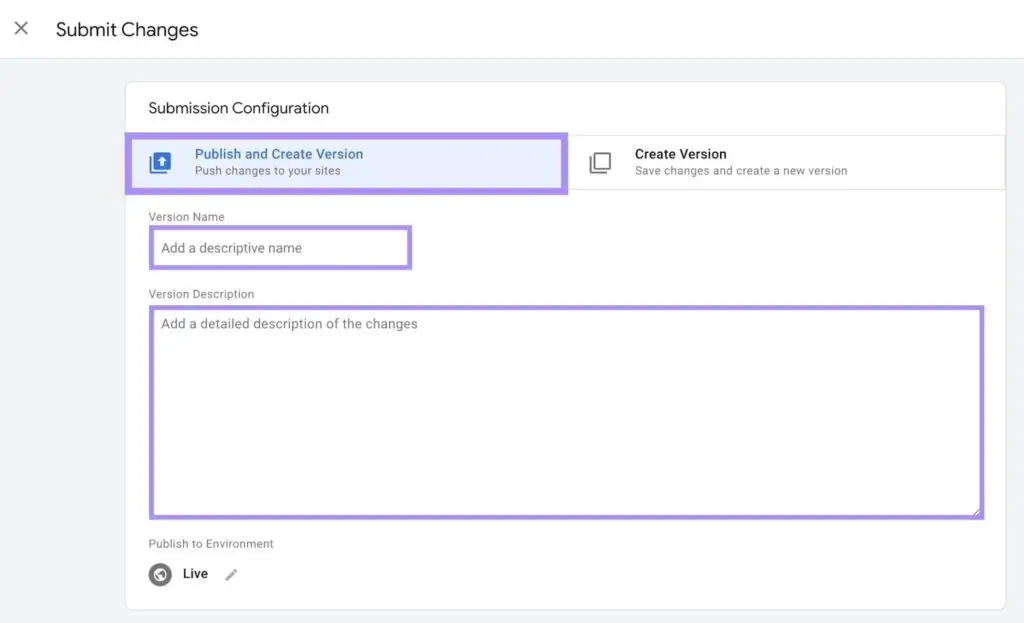
Click “Publish” to finalize the changes and activate your website’s GA4 installation!
How to Set Up GA4 from Existing Universal Analytics?
Setting up Google Analytics 4 (GA4) from an existing Universal Analytics account is a crucial step in modernizing your data collection and analysis processes. GA4 provides advanced features and capabilities that can offer deeper insights into user behavior, enhance tracking accuracy, and improve your overall understanding of website performance.
If you already have a Universal Analytics account and want to transition to GA4, follow these steps to set up GA4 seamlessly:
**Make sure you have an editor or administrator role.
Step 1: Log in to Google Analytics.
Step 2: Select the Universal Analytics account that you want to connect with your GA for the property.
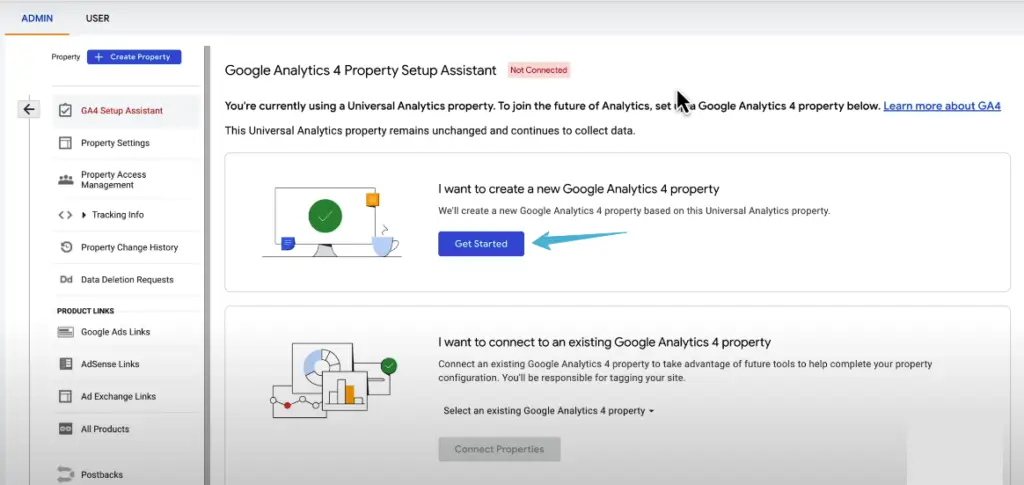
Step 3: Navigate to the Setting (Gear Icon). Now Click on “GA4 Setup Assistant”.
Now you have two options…
- I Want to create a new Google analytic property
- I want to connect to an existing Google Analytics 4 Property
Step 4: If you select the first option “I Want to create a new Google analytic 4 property” Then hit the “Get Started” button.
Then follow with the “Create and Continue”.
Now a Google Tag Pop-up. If you already have a Google Tag then select “Use a Google Tag You Already Have.” Here we are going to choose “Install a Google Tag”. Then Click “Next”
Under “Installation instructions,” choose “Install manually.” This will display the GA4 tracking code snippet.

Copy the entire code snippet displayed on the screen.
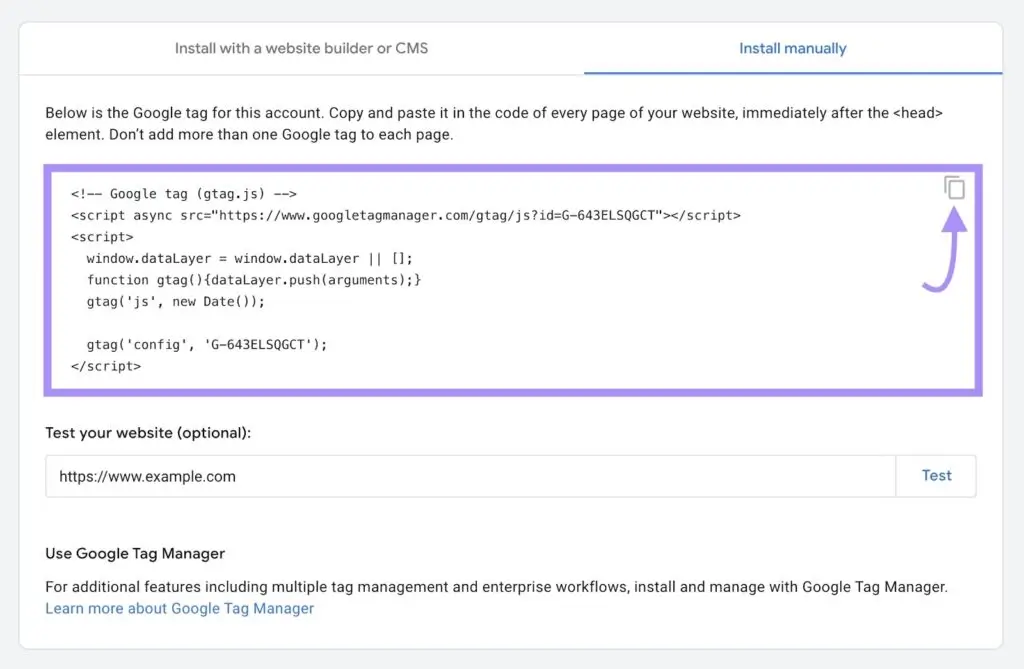
Paste the copied GA4 tracking code snippet immediately after the opening <head> tag. Make sure the code is properly indented within the <head> section.
Save the changes you made to your website’s HTML file. Upload the updated file back to your website’s hosting platform.
It might take some time for GA4 to start collecting data after implementing the code.
Or
Once you select the other option “I want to connect to an existing Google Analytics 4 Property” then here you add the GA4 Measurement ID of the existing property.
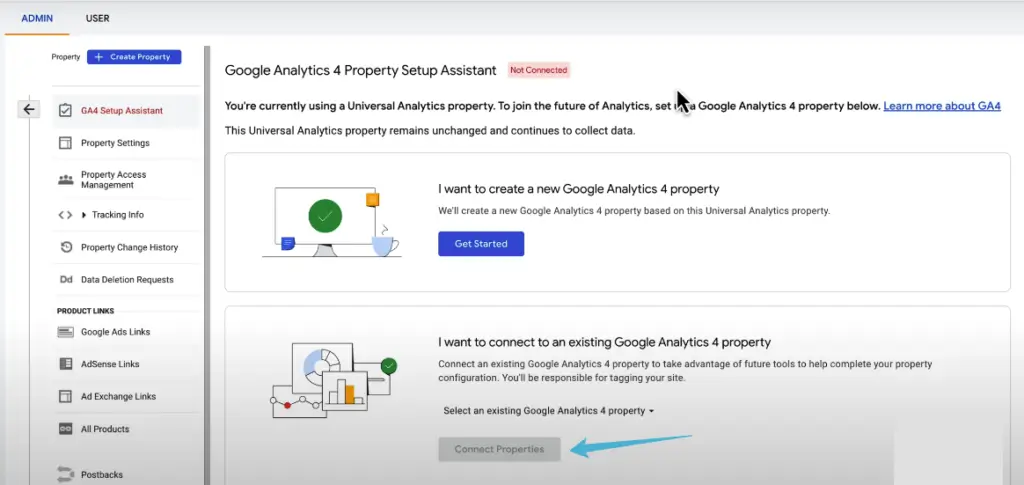
Click on the drop-down “Select an existing Google Analytics 4 property” Here you can show the existing property lists. Select the property that you want to connect. After that hit the “Connect Properties” Button.
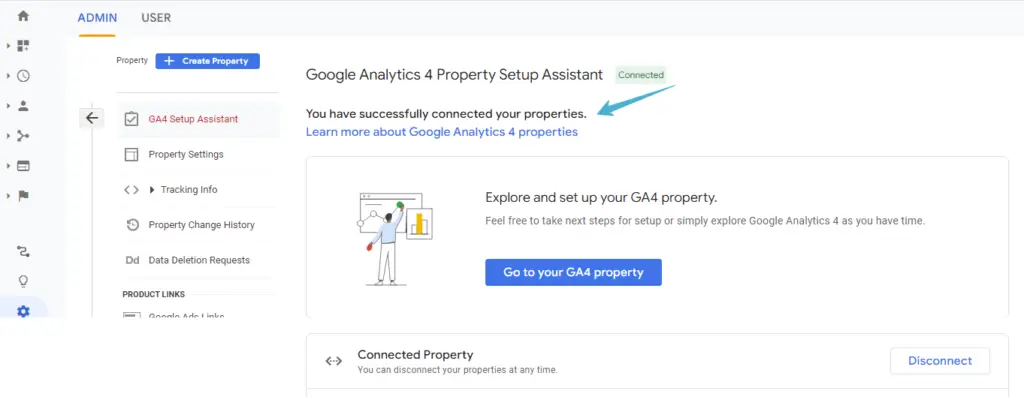
Step 5: Once you’ve completed the linking process (if still possible), you’ll see a success message at the top of your Google Analytics 4 Property Setup Assistant page that reads: “You have successfully connected your properties.”
Here’s a helpful tip: Your GA4 property name will likely be based on your existing Universal Analytics property name. For example, if your UA property is called “Example Property,” your GA4 property will likely be named “Example Property – GA4.” This makes it easier to recognize within your Google Analytics account.
Click the “Go to Your GA4 property” button to launch the Setup Assistant within your new GA4 property. This interactive guide walks you through recommended features and settings to optimize your GA4 setup.
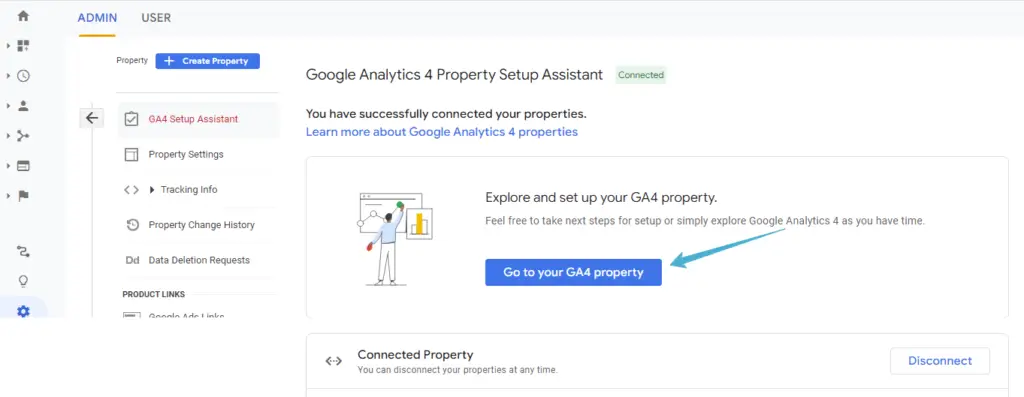
Allow up to 30 minutes for data to start flowing into your new GA4 property. To confirm data collection is working, simply browse your website and then navigate to the “Realtime” report within the GA4 reporting section.
Benefits of Google Analytics 4
Here’s a breakdown of what GA4 brings to the table:
Event-Based Tracking: Unlike UA’s reliance on pageviews, GA4 tracks everything as events. This means clicks, form submissions, video watches, and even user journeys across different pages are captured as individual events. This provides a more clear understanding of user behavior and engagement.
Privacy-Focused: With increasing privacy regulations, GA4 is built with a focus on user privacy. It offers features like anonymization and user control over data collection, making it a future-proof solution.
Cross-Platform Tracking: GA4 seamlessly integrates website and app data into a single view. This eliminates the need for separate tracking setups, giving you a holistic picture of user activity across platforms.
Machine Learning Magic: GA4 leverages machine learning to predict user behavior and identify trends. This can help you anticipate user needs, personalize their experience, and optimize your marketing efforts.
Shifting Metrics and Reports: While some core metrics remain similar, GA4 uses different terminology and has a revamped reporting structure. This might require some adjustments to adapt your existing reports and analysis
In Conclusion,
How to set up Google Analytics 4 on your website is a common concern among people. But setting up Google Analytics 4 on your website is essential for tracking user interactions. Also, helps in understanding audience behavior, and optimizing your website’s performance. By following the steps outlined in this article, you can successfully set up GA4 and leverage its powerful features. And gain valuable insights into your website’s performance.
FAQs:
1. What is Google Analytics 4 (GA4)?
Google Analytics 4 is the latest version of Google Analytics designed to provide a more integrated and user-centric approach to tracking website and app data. It offers enhanced features such as event-based tracking, machine learning capabilities, and cross-device data collection for a more comprehensive view of user interactions across different platforms.
2. How is GA4 different from Universal Analytics?
GA4 differs from Universal Analytics (UA) in several ways. It emphasizes event-based tracking rather than pageviews, utilizes a more user-centric approach, incorporates machine learning for insights, enables cross-device tracking by default, and offers a more streamlined and intuitive user interface.
3. How do I create a GA4 property?
To create a GA4 property, log in to your Google Analytics account and navigate to the Admin section. Click on the “Create Property” button and follow the prompts to set up a new GA4 property. You will need to provide details such as property name, URL, industry category, and reporting time zone.
4. Do I need to install a new tracking code for GA4?
Yes, GA4 requires a new tracking code that is different from the one used for Universal Analytics. After creating a GA4 property, you will receive a new Measurement ID that needs to be added to your website’s code to start tracking data with GA4.
5. How can I set up event tracking in GA4?
Event tracking in GA4 is essential for monitoring specific user interactions on your website, such as button clicks, form submissions, video views, and more. To set up event tracking in GA4, you can use Google Tag Manager or manually add event tracking code snippets to your website based on the events you want to track.
6. What are the privacy considerations with GA4?
GA4 provides enhanced privacy controls and options for website owners to ensure compliance with data protection regulations. You can configure data retention settings, enable user and event data deletion, and manage user consent for data collection to adhere to privacy requirements.
7. How can I analyze data in GA4?
GA4 offers a range of reports to help you understand user behavior, performance trends, and user acquisition sources. You can explore the Analysis Hub for customized analyses, use the Exploration report for detailed data exploration, and access pre-built reports for standard metrics and dimensions.
Contact us,
our team of experts is here to help and guide you with How to set up Google Analytics 4.